

It happened to me at a recent performance: broken tap! In this case, a teammate who serves as our shoe repair person replaced it before I went home. Look at that shiny, unscratched toe tap! (Thanks, Bob!)
Bob took it upon himself to learn the task years ago when his son broke a tap shortly before going onstage to compete. There was no shoe vendor at this particular competition. Somebody had supplies and was nice enough to fix his son's shoe. Bob didn't want our team to be in that situation again, so he stepped up to learn the job.
If your team doesn't have a shoe repair person, it might be time for someone to learn the process.
Bob gave me a briefing on the basics of replacing clogging taps.

For nail-on taps, you need a shoe last. There are different types. The type Bob uses is called a cobbler anvil or a shoe anvil. (An online brochure from Stevens Clogging Supplies calls it a dragon last, but I couldn't find it under that name anywhere else.) This last is reasonably portable, and more complex than I originally thought - more on that later.

My team director has a prettier version, although it's not so handy to keep in the back of someone's vehicle. This cobbler's bench has been painted beautifully to add to your home (or studio) decor when not in use!

Back to the complexity of the shoe anvil. Notice the three different ends of it. They form an adult size last, a child size last, and a last for the heel!

Position the heel of the shoe over this part of the last, and you are ready to replace a heel tap!

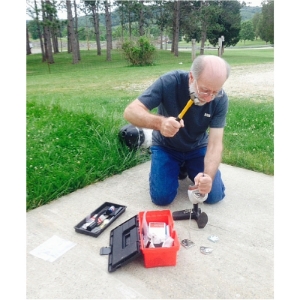
A hammer will get the nails started and set into place. Bob finishes driving the nails using a pin punch and hitting it with the hammer.

Unless this is the first installation of taps on the shoe, you will need something to remove nails that didn't break! Bob keeps a tack puller, a pair of needle nose pliers, and a pair of diagonal cutters in his toolbox for this purpose.

A stash of replacement taps is a must! Here are three sizes of heel taps, and one toe tap. Bob stores his nails in an old film canister. An old prescription pill bottle would work, too. Bob did mention that when replacing a tap, you need to slightly offset the new tap so you are not trying to drive a nail into the exact same hole.
Hurray for the team SRP! He is truly an MVP! (Fine, I totally made up the whole SRP title - shoe repair person - solely for the purpose of writing those two sentences, but I think it could catch on...)
Interested in becoming an SRP for your team?
Stevens Clogging Supplies has an online brochure about installing taps. It covers attaching taps by glue, nails, or screws.
Bob got his shoe anvil from a clogging supply company, but couldn't remember which one. When I checked the websites of the companies he mentioned as possibilities, only Stevens Clogging Supply had shoe lasts listed on their website. They did not have the anvils, but did have stands and three sizes of lasts, similar to the last attached to the cobbler's bench. Their brochure mentions the shoe anvil. You may want to check with your favorite shoe vendor to see if he/she can get you a last.
I did not find any available on Amazon at the time of this writing, but did find options on Etsy and Ebay, so that could be another resource. Make sure you check the shipping prices, though - these lasts are heavy!
How does YOUR team handle broken taps? Got any tips for the aspiring SRPs out there?
(THANK YOU to Bob Johnson for fixing my tap, giving me an education on shoe repair, and patiently waiting after clogging practice while I took photos for this post!)